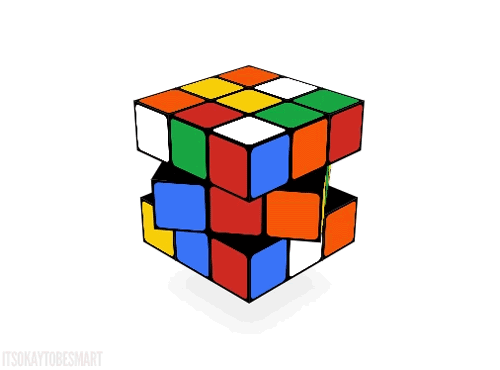
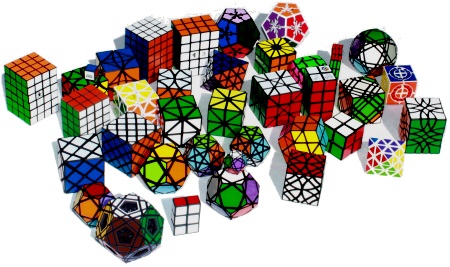
This project deals with the development of a Rubik’s cube solving robot,
based on a LEGO® MINDSTORMS® NXT 2.0 kit Robot designed for this purpose.
The robot is capable of running different kinds of cube solving algorithms written with Java.
There's much more to say on this amazing little Lego Robot, but a picture is worth a thousand words
and a full cube solving video is worth a million...
And for those of you who are still shocked by the first demo, here's another demo:
The next video demonstrates a "Cross Pattern" cube solution:
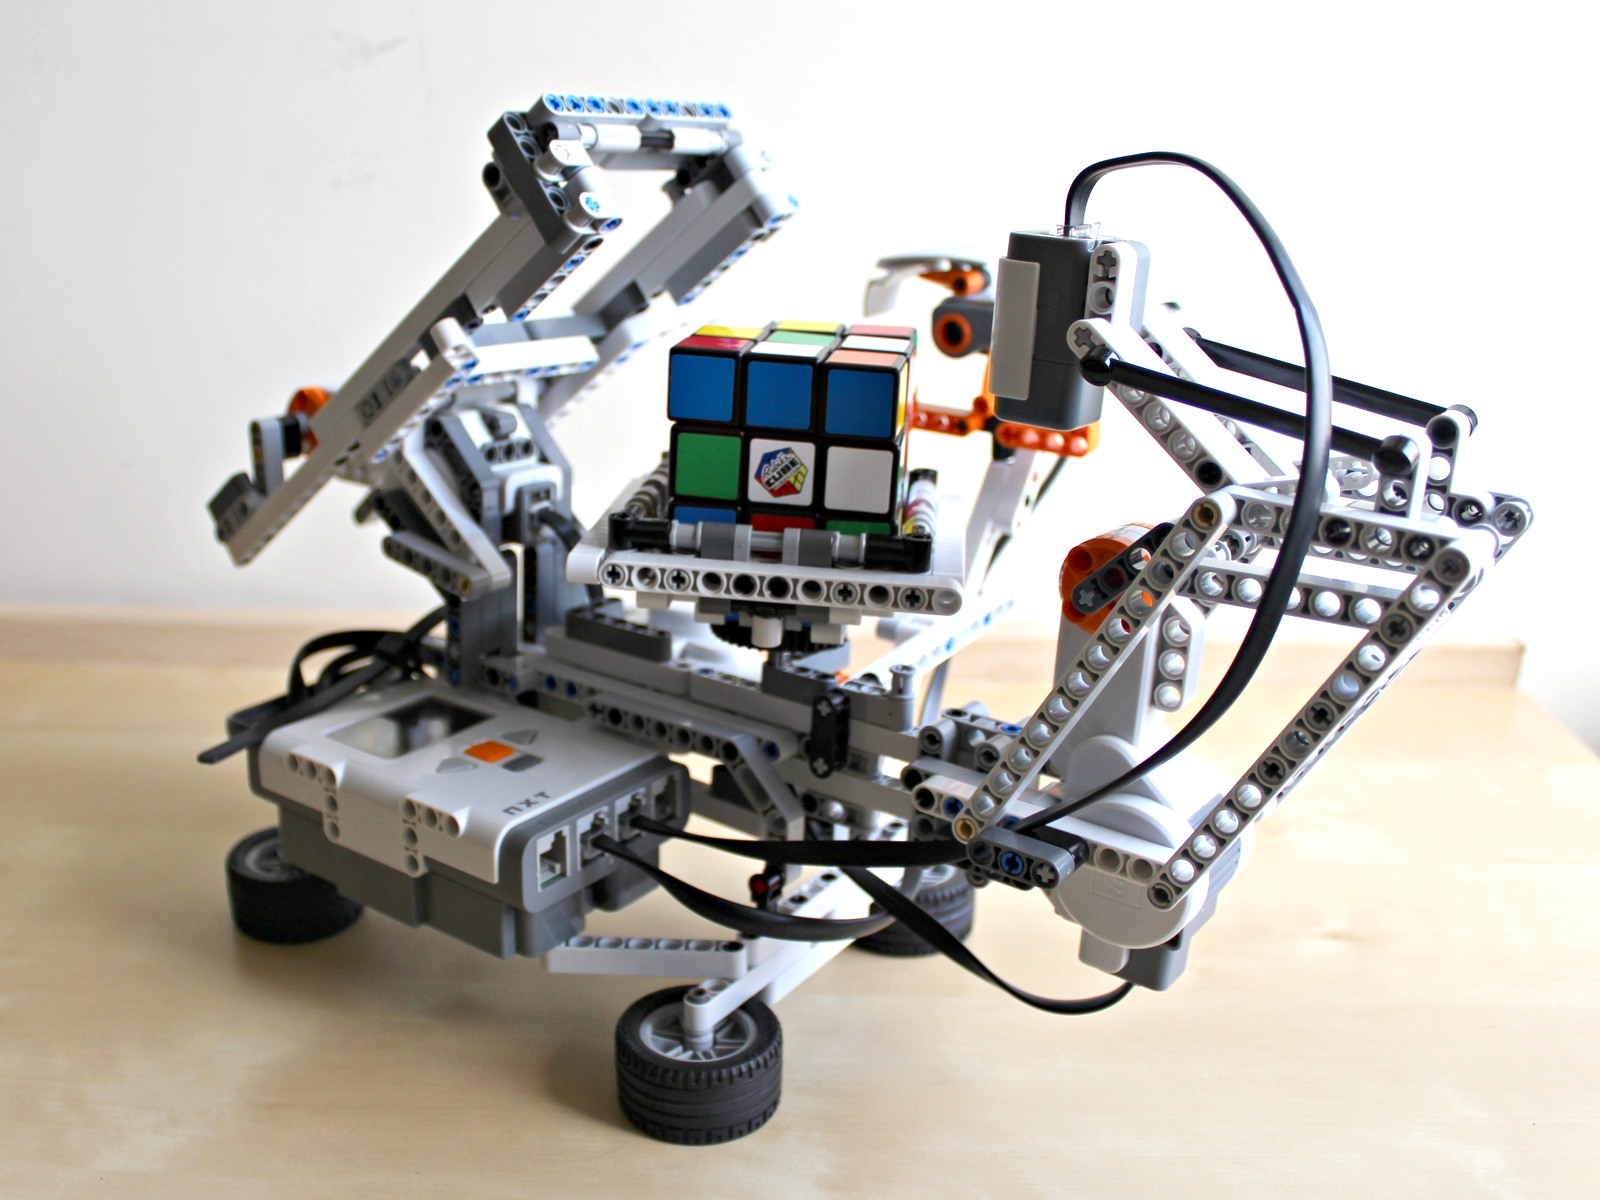
The NXT Robot
The robot is built from a LEGO® MINDSTORMS® NXT 2.0 set designed to solve the Rubik's Cube®
The building instructions are available here.
The NXT robot consists of three motors: one for the arm that performs flips,
the other for the rotation of the tray on which the cube is placed
and the third for the color sensor to be drawn to each of the sides in the color scanning phase
The robot also has two sensors: the first is responsible for color scanning and
the other is a proximity sensor that identifies the distance from the cube.
First, build the NXT project and upload it to the brick using leJOS NXJ Plug-in in Eclipse.
Only then build the PC project and run it. Upon running it will automaticlly connect to the NXT,
and will be ready for operation.
Due to the fact that the color sensor read method (RGB mode) is not implemented in the PC mode of
LeJOS, and on the other hand the algorithm cannot run in NXT mode due to insufficient memory,
we divided the project to two applications.
We've implemented a communication between the PC application that's running the algorithm and
the NXT application that performs all of the robot's operations including the unimplemented
color sensor read operation.
The Project is divided into the three following sub-projects:
Main program of the project, the PC application. Responsible for the user interface, test methods,
calibration methods and solving the cube.
This project is divided into the following main modules:
The Algorithm: receives the cube representation and calculates the required solving steps (to be
executed by the robot)
The Cube: creating a Java class which holds the cube’s representation and relevant data (passed as
an input to the algorithm)
The Robot: creating our own friendly API for scanning and manipulating the cube
The Robot supports the following actions for the Cube's usage:
Robot.flipCube(...) // performs 0, 1 or 2 Cube BackFlips as requested
Robot.rotateCube(...) // performs Full Cube Rotations to the LEFT, RIGHT, or 180 degrees
Robot.turnFace(...) // Specific Cube Face Rotation to the LEFT, RIGHT, or 180 degrees
Robot.scanFace(...) // scans all colors in the given cube's face
More operations...
Following is the 'flipCube' method, which flips the cube according to the flipMethod enum parameter - SINGLE(1), DOUBLE(2), NONE(0):
/**
 * Flip the cube
 *
 * @param method Flip method
 * @see FlipMethod
 */
public static void flipCube(FlipMethod method) {
    for (int i = 0; i < method.getFlips(); i++) {
        Arm.motor.rotateTo(ARM_POSITION_HOLD + ARM_POSITION_HOLD_EXTRA);
        Arm.motor.rotateTo(ARM_POSITION_HOLD);
        delayMillisec(ARM_FLIP_DELAY_MS);
        Arm.motor.rotateTo(ARM_POSITION_TACKLE);
        Arm.motor.rotateTo(ARM_POSITION_HOLD);
    }
}
Following is the 'turnFace' method,
which turns the currently facing down face selected face according to the turning direction argument:
/**
 * Rotate the face currently facing down
 *
 * @param direction Turning direction
 * @see Direction
 */
public static void turnFace(Direction direction) {
    Arm.motor.rotateTo(ARM_POSITION_HOLD);
    int extraRotation = direction.getDegree() > 0 ?
                                        TRAY_MOTOR_EXTRA_ROTATION : (-TRAY_MOTOR_EXTRA_ROTATION);
    Tray.motor.rotate((direction.getDegree() + extraRotation) * TRAY_MOTOR_ROTATION_FACTOR);
    Tray.motor.rotate((-extraRotation) * TRAY_MOTOR_ROTATION_FACTOR);
}
Following is the 'rotateCube' method,
which Rotates the entire cube according to the direction argument:
/**
 * Rotate entire cube
 *
 * @param direction Rotate direction
 * @see Direction
 */
public static void rotateCube(Direction direction) {
    if (direction != Direction.NONE) {
        Arm.release();
        Tray.rotate(direction.getDegree());
    }
}
The NXT's color sensor is problematic and unreliable, so we needed to be creative in order to scan the
cube.
Those are the phases of our color scanning development:
We started with the ‘ReadColorId’ method supplied in LeJOS API.
We quickly understood that it cannot distinct between red and orange and therefore is useless.
Later on we've used the RGB representation reading of each color.
In order to utilize those readings, we've added calibration method that saves the RGB read of each
color
before starting solving the cube.
Then, when scanning the face and read RGB of some color, we've searched for the closest color with
the calibrated data we saved before.
But... we still had problems with red and orange colors!
Our next step was to develop color corrector method.
Since each of the cube's corners are deterministic, we can correct any red and orange mistakes in
the cube's corners by looking at their neighbors.
More about it can be learned below.
And yet it wasn't enough! We were on 70% success rate because we still had problems with red and
orange colors that are not on the corners...
SHIFT DELETE.
We needed to redesign the color reading method, we've decided to calculate the colors relatively.
First scan RGB colors of the whole cube.
Then, filter out all the white readings by their destination to the calibrated data (similar to step
2 above).
Last, converting the readings to HSV format, and sorting them by their hue value.
The first 9 lowest hue values are defined as red, the next 9 defined as orange, etc.
Now, under good lighting conditions we're on 99% success rate!
Following is the method responsible for scanning single cube's face
/**
 * Scan cube's face
 *
 * @param allColors List of all scanned colors
 * @param orientation Current cube orientation
 * @see Orientation
 */
public static void scanFace(ArrayList allColors, Orientation orientation) {
    int coordinate, row, col;
    int[] rgb;
    SensorLocation location;

    Arm.release();
    for (coordinate = 0; coordinate < 8; coordinate++) {
        row = COORDINATE_SCAN_ORDER[coordinate][0];
        col = COORDINATE_SCAN_ORDER[coordinate][1];
        location = coordinate % 2 == 0 ? SensorLocation.ALIGN : SensorLocation.CORNER;
        ColorDetector.setMotorLocation(location);
        rgb = ColorDetector.sensor.readColorRgb(SENSOR_NUMBER_OF_SAMPLES);
        RawColor rawColor = new RawColor(orientation, row, col, rgb);
        allColors.add(rawColor);
        Tray.motor.rotate(TRAY_SCAN_STEP_DEGREE);
    }

    row = COORDINATE_SCAN_ORDER[coordinate][0];
    col = COORDINATE_SCAN_ORDER[coordinate][1];
    ColorDetector.setMotorLocation(SensorLocation.CENTER);
    rgb = ColorDetector.sensor.readColorRgb(SENSOR_NUMBER_OF_SAMPLES);
    RawColor rawColor = new RawColor(orientation, row, col, rgb);
    allColors.add(rawColor);
    ColorDetector.motor.rotateTo(0);
}
Following is the method responsible for setting the cube's colors given
the raw readings of all the colors:
/**
 * Place all scanned colors on the cube, fix red/orange corners
 * and print result to logger
 *
 * @param allColors All scanned colors
 */
private void calcAndSetColors(ArrayList allColors) {
    setWhitesByDistance(allColors);
    setNonWhitesByHue(allColors);
    ColorCorrector.fixCorners(faces);
    printCubeColorsToLogger();
}
public class ColorCorrector
An essential component in the process of solving a cube by robot,
is achieving a reliable image of the cube's colors.
The ColorCorrector class is intended to do exactly that! It corrects color scanning errors
(which often occur due to the sensitive and unideal color sensors)
and provides a highly reliable description of the cube's colors (to be safely used by the algorithm).
The NXT's color sensor has difficulties to distinguish between Red and Orange colors.
Since we are able to determine the colors at each of the cube's corners by it's neighbors,
we can detect and correct any Red/Orange mix up at the corners.
This is how the class represents the corner:
The following 'fixCorners' method is responsible for the fix routine:
Iterates over all the cube's Red/Orange corners and fix them according to their neighbors.
static void fixCorners(Face[] faces) {
    boolean cubeFixed = false;
    for (Orientation orientation : Orientation.values()) {
        Face face = faces[orientation.getValue()];

        for (Corner corner : Corner.values()) {
            if (face.getColor(corner.row, corner.col) == Colors.RED
                            || face.getColor(corner.row, corner.col) == Colors.ORANGE) {
                Colors left = getCornerLeftColor(faces, face, corner);
                Colors right = getCornerRightColor(faces, face, corner);

                for (Colors[] cornerColors : RED_ORANGE_CORNERS) {
                    if (left == cornerColors[0] && right == cornerColors[2]) {
                        Colors scannedColor = face.getColor(corner.row, corner.col);
                        Colors cornerColor = cornerColors[1];
                        if (scannedColor != cornerColor) {
                            face.setColor(corner.row, corner.col, cornerColor);
                        }
                    }
                }
            }
        }
    }
}
As mentioned before, we needed to implement communication between the PC and NXT applications.
We've simply wrapped all of the motors and sensors operations in the PC project, and send appropriate
command to the NXT application, that parsed the command and act upon it.
For example, this is the implementation of the rotateTo method in the PC project:
/**
 * Rotate motor to specified location
 * @param limitAngle Degrees limit to rotate
 */
public void rotateTo(int limitAngle) {
    NxtCommand.sendCommand(NxtOperation.OPERATION_TYPE_MOTOR, id, NxtOperation.OPERATION_ID_ROTATE_TO, limitAngle, 0);
}
This data sent as bytes to the NXT application. Upon receiving the raw bytes data,
the NXT application interprets and act upon it:
/**
 * Run the main loop waiting for command from PC
 * This function exits upon pressing the ESC button on the NXT
 */
private static void runCommandListener() {

...

        for (;;) {
            try {
                if ((inputBufferLength = in.read(inputBuffer)) > 0) {
                    if (inputBufferLength != 7) {
                        printToLcd("Unknown data", "received", 10000);
                        continue;
                    }
                    printToLcd("Command recieved:", bytesToHex(inputBuffer), 0);
                    byte operationType = inputBuffer[0];
                    int port = (int) inputBuffer[1];
                    byte operationId = inputBuffer[2];

                    int argument = 0;
                    argument |= (((int) inputBuffer[3]) & 0x000000FF) << 24;
                    argument |= (((int) inputBuffer[4]) & 0x000000FF) << 16;
                    argument |= (((int) inputBuffer[5]) & 0x000000FF) << 8;
                    argument |= (((int) inputBuffer[6]) & 0x000000FF) << 0;

                    if (operationType == OPERATION_TYPE_MOTOR) {
                        switch (operationId) {
                        case OPERATION_ID_ROTATE:
                            motors[port].rotate(argument);
                            break;
                        case OPERATION_ID_ROTATE_TO:
                            motors[port].rotateTo(argument);
                            break;

...
The Cube Class
Provides a smart and compact Cube object which holds the cube’s data: Faces, colors and
orientations
Managing changes in the cube’s orientations caused by rotations and flips (performed by the robot)
The Cube.java class acts as the "middle man" between the Robot and the Algorithm:
The main.java program creates the Cube object and passes it on to the Algorithm.
The algorithm utilizes the Cube's functionality to read the Cube's colors and manipulate the Cube's
faces, while the Cube transforms these requests to Robot actions.
The advantage is the Cube's ability to keep track of the changing orientations whenever the Robot
rotates and flips the Cube.
The following 'ICube' and 'IFace' interfaces expose the public methods of the cube,
which provide a safe and efficient way to manipulate the cube while tracking state changes.
The public methods were carefully planned to expose only the exact functionality required for the client (namely
the Algorithm class)
while keeping things 'simple' as possible.
The IFace interface, which represents each of the six cube faces:
public interface IFace {
   /*
    * Returns the color of a position (row, col) in a face
    */
    public Colors getColor(int i, int j);

    /*
     * Represents a turn of the face in a desired direction.
     * It uses the dynamic orientation and the actions table to derive
     * the number of flips and rotation needed in order to bring this face to the bottom.
     * after this face is brought to the bottom, it is turn in the desired direction.
     * @param direction The direction that the face should turn
     */
    public void turn(Direction direction);
}
The ICube interface, which represents the entire cube:
public interface ICube {
/*
 * returns the face which is currently in the orientation requested (UP, DOWN, LEFT, ...)
 */
IFace getFace(Orientation orientation);

/*
 * Scan and set the cube colors.
 * The method is first to scan all of the cube's colors in RGB mode,
 * and calculate their HSV representation as well as their distance from
 * the calibrated white RGB.
 * Second, sort all the colors by their white distance (since white doesn't have
 * meaningful Hue value), and place them on the cube.
 * Last, sort all the colors by their Hue value and place them on the cube
 * according to their Hue value.
 */
void setColors();

}
The Cube object is the representation of the Rubik's Cube as provided to the Algorithm class
for calculating the required steps to reach a full solution.
A Cube object is consisted of six Face objects, where each one provides the functionality of a 'face turn'
as well as the option of reading all face's colors.
One of the interesting challenges regarding the manipulations of the cube,
arises from the fact that the robot can only rotate the bottom cube's face (placed on it's tray),
while the algorithm may instruct to turn any of the cube's faces at each step.
As consequence, the Robot often flips and rotates the whole cube in order to position the selected face
as the bottom face.
To bridge this gap, we let the algorithm act as if the cube is static (initial orientations never change),
while translating each 'static' face orientation selection (Up, Down, etc.) to the 'dynamic' actual
orientation of the selected face.
This process is implemented efficiently by the Cube class, by using an Orientations matrix and an Actions array
which help keeping track of the 'dynamic' orientation of each of the cube's faces.
The Orientations Matrix:
Following every rotation and flip of the cube executed by the robot, the cube's orientations change (i.e. 'UP' face may become 'DOWN', etc.)
The Orientations Matrix is a static matrix which represent the new position of every face
once any face is set to be the bottom face ('DOWN' orientation).
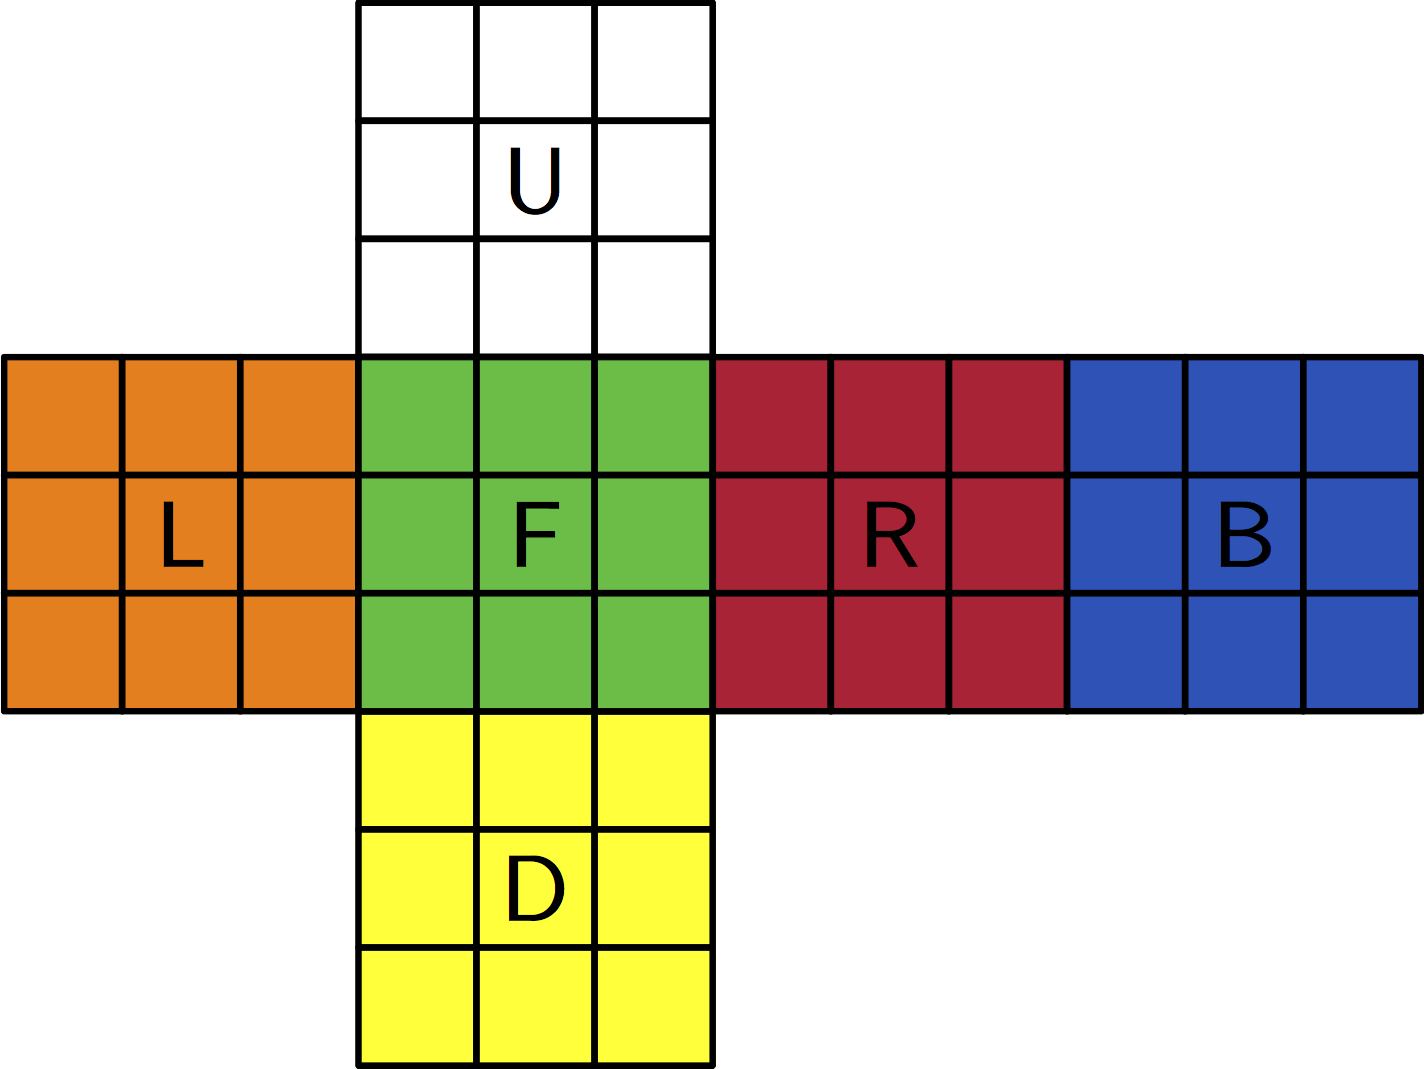
The faces are listed in the following order: 0 = Up, 1 = Right, 2 = Front, 3 = Down, 4 = Left, 5 = Back
Example of use: Suppose we need to set the current 'FRONT' face to be the bottom ('DOWN') face,
in order to know how this action affects the other faces, we should go to the 2nd row of
the matrix (as listed above: 2 = FRONT), and we will find the new positions of the other faces:
position 0 has the value L -> indicates that the UP face (0 = UP) becomes the LEFT face.
position 1 has the value F -> indicates that the RIGHT face (1 = RIGHT) becomes the FRONT face, etc.
in conclusion we got these transforms: U->L , R->F , F->D , D->R, L->B , B->U
this matrix help us to determine the positions of the faces in any transition.
Thanks to the 'Orientations Matrix' the routine of updating the new orientations of the faces after
a transition of the cube, becomes a simple quick task -
The following method receives the current orientation of the face that was just set to the bottom,
and performs required orientations updates to all six faces:
void updateOrientations(Orientation orientation) {
Orientation[] newOrientations = ORIENTATION_MAT[orientation.getValue()];
    for (int i = 0; i < 6; i++) {
        faces[i].dynamicOrientation = newOrientations[faces[i].dynamicOrientation.getValue()];
    }
}
The Action class, holds the required cube flips and turns
to set a selected face as the bottom face:
public class Action {

    public FlipMethod flips;
    public Direction direction;

    public Action(FlipMethod flips, Direction direction) {
    this.flips = flips;
    this.direction = direction;
    }
}
The 'Actions' Array:
specifies the flips and rotations that the robot should execute on the cube,
to set the selected face as the bottom face (the only face that can be turned):
For instance, in order to turn the 'UP' face by 90 degrees clockwise, the Robot must first flip the cube twice
to set the 'UP' face as the bottom, and then turn the face by 90 degrees counterclockwise.
Another example: in order to set the FRONT face as the bottom,
the Robot should rotate the cube left and then perform a flip.
This action is stored on the actions array at position 2 (since 2 = FRONT): {FlipMethod.SINGLE, Direction.LEFT}
actions[Orientation.U.getValue()] = new Action(FlipMethod.DOUBLE, Direction.NONE);
actions[Orientation.D.getValue()] = new Action(FlipMethod.NONE, Direction.NONE);
actions[Orientation.F.getValue()] = new Action(FlipMethod.SINGLE, Direction.LEFT);
actions[Orientation.B.getValue()] = new Action(FlipMethod.SINGLE, Direction.RIGHT);
actions[Orientation.R.getValue()] = new Action(FlipMethod.SINGLE, Direction.MIRROR);
actions[Orientation.L.getValue()] = new Action(FlipMethod.SINGLE, Direction.NONE);
At the beginning of the project, we devoted a considerable amount of time for exploring alternatives
for the Rubik's cube solving algorithm - this includes research of existing algorithms as well as ideas
for an original solution.
We decided to go for a solution that will allow us to inject the full code into the robot
to achieve an autonomous cube solver.
Therefore, When exploring the alternatives, we examined each algorithm in terms of resource consumption and complexity:
Memory required during the entire program run
The complexity of the calculations and the processing time required
The difficulty in implementing the code
Overall runtime
And more...
Finally, the presented considerations and research led us to choosing the well known two-phase algorithm.
We are using the two-phase algorithm, introduced by Herbert Kociemba in 1991-1992.
The problem of solving the cube is translated into a shortest path in a graph problem, where the nodes are the different states of the cube,
and there is an edge between two nodes if one state can be reached from the other by turning one face of the cube.
Exploring and understanding the algorithm was one of the major parts of our project, and we believe it was quite educational (and most definitely fun :)).
The algorithm first tries to find a path from cube’s initial state to one of the states that can be reached
from a solved cube using only the following moves: U, D, R2, L2 F2, B2.
Once we found a path, the algorithm tries to find a path from the current state to the solved cube,
using only the moves mentioned above.
The path search in the graph is done using the IDA* algorithm. Finding a shortest path in a graph can be
done using a BFS-like tree search, but it requires a lot of memory. Using DFS-like tree search will help
us finding a path, but not the shortest one. Therefore, the two-phase algorithm uses an iterative
deepening search. Iterative deepening (ID) means a DFS search is performed iteratively for a growing
tree depth. The search uses a heuristic function to stop searching in a specific branch when the
solution cannot be found with the given state and depth. The heuristic function gives a lower bound on
the number of moves required to reach from a state to the goal state.
Cube is represented in 3 levels:
Facelets Level - cube is represented by an 54 entries array. Each entry is one of the 6 possibe colors of cube faces.
This is the initial, most simple representation.
Cubie Level - cube is represented by it's corners and edges permutations and orientations, compared to a solved cube.
This representation tells us where to move and how to rotate each corner and where to move and how to flip each edge in order to reach a given cube from a solved cube.
Using this representation, we can define the inverse cube of a cube, which is a cube that if we perform the set of moves created it from a solved cube on the original cube, we reach the solved cube.
We can also define a multiplication of two cubes. You can think of multiplying cube A by cube B like taking a set of moves that transform a solved cube into B cube and perform it on A.
Coordinate Level - cube is represented using a set of coordinates driven from it's corners and edges permutations and orientations compared to a solve cube.
The set of coordinates is not the same in both phases. This set of coordinates defines us the state of the cube, which is used during the search algorithm.
For more information regarding the two-phase algorithm, please refer to Kociemba’s site: http://kociemba.org/cube.htm
Our implementation is based on Kociemba’s implementation for this algorithm, which he published in his site.
It implements the two-phase algorithm in a simple form, and does not use symmetry for better performance.
Moreover, the implementation does not find the shortest solution.
It finds a short solution for the first phase, and then tries to find a short solution from current state
to the solved cube, so the combination of the two is not necessarily the shortest solution.
We added the ability to select a pattern, so that preforming the set of moves returned by the
algorithm will produce a cube with the selected pattern.
To allow the pattern ability, we calculate the inverse cube of the pattern, multiply it by the given
cube and then find a solution for the resulted cube.
The algorithm finds a solution for the resulted cube, which is also a set
of moves to create its reverse cube from a solved cube. This reverse cube is the multiplication of the
reverse of the original cube and the pattern, so applying the resulted set of moves on the cube brings
us from the initial cube to a solved cube and then to the patterned cube (this is not done one after the
other, this is just an easier way to understand what happens).
Tests
Unit Tests
We used the Junit framework for unit testing. All unit tests are found in the MindCuber_UT project.
Since most of our logic in the project containd in the algorithm module, we've put our best efforts testing it using unit tests, and indeed we've reached 96.8% coverage rate!
Algorithms tests are found under the twophase package. There is a seperate test class for each of the 3 cube representations classes: CoordCubeTest, CubieCubeTest and FaceCubeTest.
We tested classes constructors, properties and methods. This includes coordinate calculations, cube operations such as multiply and inverse, translations from one representation to another, cube validation etch.
In the CoordCube test, we checked the creation of the all the static arrays that are used in the algorithm. We used Kociemba website and other examples to calculate the expcted results.
We also tested the main function that finds a solution, for both valid and invalid cube, with and without pattern supplied. This is done in SearchTest class.
Cube class tests are found under the cube package.
Under the application package you can find tests for the conversion between cube and algorithm representation.
The different tests are documented in each test class.
In most tests, we used text files which contain the inputs and expected results. These files can be found under testsFiles. This allows adding more inputs without changing the code.
To run the tests, open the MindCuber_UT project using eclipse, right click on the project and choose Run As..->Junit (Or click the Run button in the menu bar)
Since the robot module is mostly an API we've decided to focus on validation tests.
To check the robot reliability and robustness we've developed an over-night test that performs 100
cube solving operations and validates the cube after each operation.
Those tests helped up caught and fix rare exceptions. In addition it helped
us optimized some parameters and increase our success rate.
In the last tests' cycle we've reached 98% success rate! (98 successes out of 100 tries)
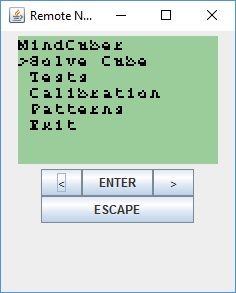
Solve cube: Use this option after completing necessary calibration steps for solving the cube
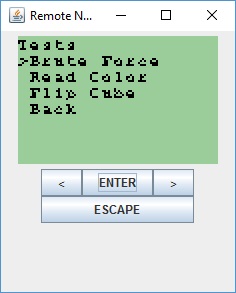
Tests:
This menu contains all of the robot's tests recommended to run to validate all robot's operations:
Brute force - performs random robot's operations
Read color - read current color and print result to logger
Flip cube - performs cube flipping operations
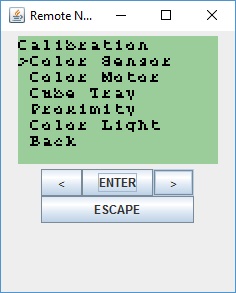
Calibration:
This menu contains all of the robot's calibration routines:
Color sensor - calibrate white color reading, place white color below the sensor and press Enter
Color motor - calibrate the color sensor motor. Follow the instructions of the program to calibrate the color sensor to it's three optional positions. Use the < and > buttons to rotate the motor
Cube tray - calibrate the cube's tray motor. Use the < and > buttons to rotate the tray to be aligned
Proximity - read the current proximity sensor data
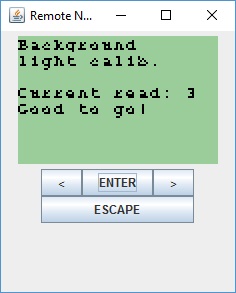
Color light - read the current background light. Use it to make sure the lighting condition of the room are suitable for the color sensor:
Light okay:
Light too strong
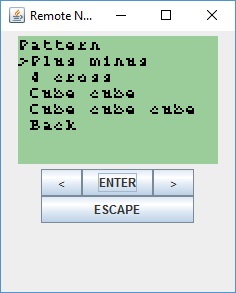
Pattern:
This menu contains additional patterns for cube solving:
Plus minus
4 cross
Cube cube
Cube cube cube
General Remarks
The described project was carried out as part of the "Models in Software Engineering" Workshop led by Dr. Shahar Maoz, Tel Aviv University CS School.
Development team members: Nerya Meshulam, Gil Akiva, Nir Zaidman, Elad Yacobi and Ofek Amir.

 Cube Solving Robot
NXT Robot
Dev Environment
Project Architecture
Requirements & Assumptions
Robot Class
Cube Class
Solving Algorithm
Tests
User Guide
General Remarks
Repository
JavaDoc
Cube Solving Robot
NXT Robot
Dev Environment
Project Architecture
Requirements & Assumptions
Robot Class
Cube Class
Solving Algorithm
Tests
User Guide
General Remarks
Repository
JavaDoc